
Schritt-für-Schritt-Anleitung
Schritt 1: Den Backofen vorheizen
Heizen Sie Ihren Ofen auf 175°C (350°F) vor. Eine Gugelhupfform einfetten und leicht bemehlen oder mit antihaftbeschichtetem Backspray besprühen.
Schritt 2: Machen Sie die Käsekuchenschicht
In einer Rührschüssel den weichen Frischkäse und den Zucker glatt rühren.
Das Ei und den Vanilleextrakt unterrühren, bis alles gut vermischt ist. Verwerfen.
Step 3: Make the Red Velvet Cake Batter
In a large mixing bowl, combine the red velvet cake mix, vegetable oil, eggs, buttermilk, and vanilla extract. Mix until smooth and well combined.
If using homemade batter, prepare according to your recipe and add red food coloring for the signature red velvet color.
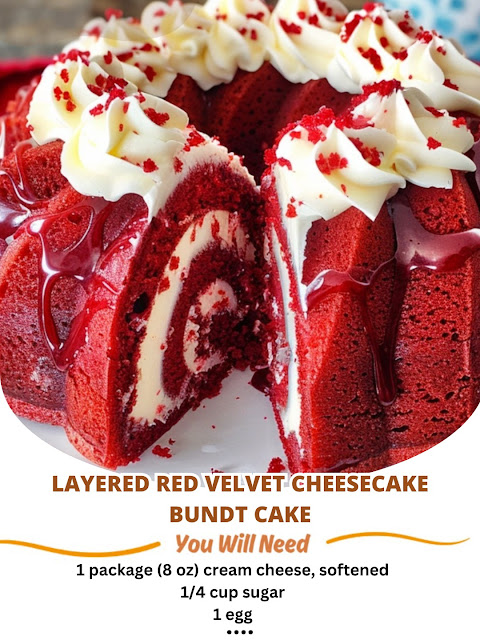
Step 4: Assemble the Cake
Pour half of the red velvet batter into the prepared Bundt pan, spreading it evenly across the bottom.
Spoon the cheesecake mixture over the red velvet layer, spreading it gently to cover the batter.
Top with the remaining red velvet batter, carefully spreading it to cover the cheesecake layer. Use a knife to gently swirl the layers for a marbled effect, if desired.
Step 5: Bake
Bake for 45–55 minutes , or until a toothpick inserted into the center comes out clean (some cheesecake crumbs are okay).
Let the cake cool in the pan for 15 minutes before carefully inverting it onto a wire rack to cool completely.
Step 6: Add the Glaze (Optional)
In a small bowl, whisk together the powdered sugar, milk, and vanilla extract until smooth. Add more milk, 1 teaspoon at a time, to reach your desired consistency.
Drizzle the glaze over the cooled cake and let it set before serving.
Why This Recipe Works
Cheesecake Magic : The creamy cheesecake layer adds a tangy contrast to the sweet red velvet cake.
Bundt Pan Beauty : The pan creates a stunning, layered presentation without requiring advanced decorating skills.
Boxed Mix Shortcut : Using a red velvet cake mix saves time while still delivering rich flavor and color.
Variations to Try
Add Chocolate Chips : Fold mini chocolate chips into the red velvet batter for extra richness.
Gluten-Free Option : Use gluten-free red velvet cake mix and gluten-free flour for the cheesecake layer.
Fruit Topping : Serve with fresh raspberries or strawberries for a pop of color and freshness.
Spice It Up : Add a pinch of cinnamon or nutmeg to the cheesecake layer for warmth.
Vegan Version : Substitute vegan cream cheese, eggs, and red velvet cake mix for a plant-based option.
Tips for Success
Don’t Overmix : Overmixing the batters can make the cake dense—stir just until combined.
Cool Properly : Let the cake cool completely before glazing to prevent the glaze from melting.
Storage : Store leftovers in an airtight container in the fridge for up to 3 days.
Serving Suggestions
Romantic Touch : Garnish with edible flowers or a dusting of powdered sugar for elegance.
Brunch Staple : Pair with coffee, tea, or fresh fruit for a complete meal.
Party Platter : Serve alongside other desserts like brownies, tarts, or fruit skewers for variety.
Final Thoughts
Dieser geschichtete Red Velvet Cheesecake Gugelhupf ist eine Hommage an kräftige Aromen, cremige Texturen und mühelosen Genuss und bietet ein Dessert, das sich luxuriös und dennoch zugänglich anfühlt. Mit seinen anpassbaren Optionen, seinem endlosen Charme und seiner einfachen Zubereitung ist es ein Rezept, das Sie mit Sicherheit beeindrucken wird, egal ob Sie für einen besonderen Anlass kochen, einen ungezwungenen Snack genießen oder einfach nur Lust auf etwas Befriedigendes haben.
Du bist dran! Haben Sie schon einmal Gugelhupf gebacken oder mit geschichteten Desserts experimentiert? Teilen Sie unten Ihre Lieblingsvariationen oder Servierideen. 🎂
